Showing posts with label technique blog hop. Show all posts

Saturday, April 16, 2022

Layered Flowers Technique Blog Hop

Welcome to our Technique Blog Hop! This month, we are featuring Layered Flowers as our technique. This could be achieved through Thin Cuts, Cricut cuts, stamp images, or even with masking.


This blog hop is a great big circle so you can start wherever you want and continue through to see all the fabulous artwork incorporating this technique.

If you are coming from Michelle's Blog you are on the right track! 

Easter is this weekend, and I like to do pages in advance- I know I'll be wearing a bright and cheerful dress so I wanted to use bright colours for this year's Easter Family Photo scrapbook page. 

I also set myself a challenge to combine birthday papers, an Easter stamp set and florals!

I used the Mix In Paper Packet as the base, and added some other paper accents using the Cake Day Paper Packet and the Cake Day Picture My Life Cards


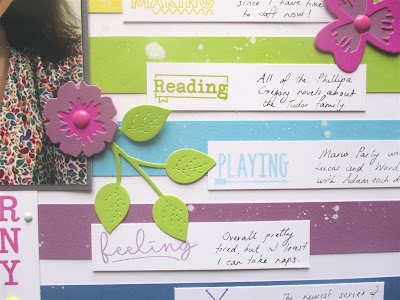
The Layered Flowers Thin Cuts make it so easy to add bold embellishments- I used a combination of Green Apple, Wild Berry and Lemonade Cardstock from the Cake Day Coordinating Cardstock to create the flowers. I also added Wild Berry Dots to some of the flowers.

Here you can see even more floral accents- I cut the Easter Eggs out from my Cricut using the EGGS font on my computer, and then tone on tone stamped some flowers from the Some Bunny Loves You Stamp Set and Thin Cuts. The floral border at the top is also from this stamp set and layered with some more Wild Berry Dots.


As a side note- how cute are these chicks from the stamp set! I had to add them into my layout.


I think I managed to combine Birthday, Easter and floral accents successfully into my layout- what do you think?

Thanks for stopping by!  Please continue onto Darlys' Blog where you will find her sharing her layered flowers technique.  Be sure to leave a comment and happy hopping!

Wednesday, March 16, 2022

Technique Blog Hop- Creative with Cardstock

Welcome to our Technique Blog Hop! This month, we are featuring lots of awesome ideas with cardstock.

This blog hop is a great big circle so you can start wherever you want and continue through to see all the fabulous artwork incorporating this technique.

If you are coming from Michelle's Blog you are on the right track! 

I absolutely love all the bright colours of cardstock that CTMH has- such a pretty rainbow of brightness! I created a 12x12 layout using eight strips of 1 x12 cardstock in Wild Berry, Candy Apple, Nectarine, Lemonade, Avocado, Capri, Grape and Sapphire as I wanted to showcase some of my favourite colours. This layout background is a fun way to create different colour combos on your layout, and you can also do this with patterned paper or a combination- anything you like! I slightly trimmed the White Daisy base and layered in on Pewter cardstock- this is one of my favourite techniques to anchor a layout. 


I also cut up some White Daisy cardstock into 7/8 inch strips to do my journalling, and stamped each one using the corresponding ink colour using the All Day Every Day stamp set. 

Another favourite technique of mine for cardstock backgrounds is to use Watercolour Paints to splatter the background and create a grunge look- here I used white to offset all the colourful strips but you can use any colour you want! I simply loaded my waterbrush, added the white paint and flicked it onto the page. 


I also used cardstock and the Layered Flowers Thin Cuts to create the floral embellishments on this page- CTMH cardstock cuts like butter and the stitched detail on these thin cuts is amazing. I added some Wild Berry Dots to the centre of each flower for some dimension.


The last thing I like to do with cardstock is to stamp my title on it and then dovetail the ends to make a pennant. This is a really easy way of adding any cardsotck journal box, stamped title or even plain cardstock as an embellishment. I stamped this in Wild Berry Ink and then surrounded the title with some of the Cake Day Dots.


Cardstock only layouts don't have to be boring- thin cuts, paint splatters and dove tailing can all take your cardstock elements to the next level.

Thanks for stopping by!  Please continue onto Haley's Blog where you will find her sharing her cardstock technique.  Be sure to leave a comment and happy hopping!

Wednesday, February 16, 2022

February Technique Hop- Stunning Stencils


Welcome to our Technique Blog Hop! 

This blog hop is a great big circle so you can start wherever you want and continue through to see all the fabulous artwork incorporating this technique.

If you are coming from Michelle's Blog you are on the right track! 

I love the new Sawyer collection, and part of this is the Sawyer Digital Art Collection.


I saw the cute card front (top right corner) and immediately thought how great it would be as a stencil- and so I cut it from my Cricut using a 11" length ratio to create a stencil for a scrapbook page.

I stuck the template to some White Daisy Cardstock using the temporary Quickie Glue Pen and then simply painted over it using my Watercolour Paints in orange, pink and purple hues.


I was left with this very cool stencil pattern, which matched the Sawyer collection and my photos perfectly!


Once this was dry, I cut it down to size to create a banner for my scrapbook page. I had these gorgeous photos of my niece wearing pink, purple and orange and so I paired the stencil with a plain Peach Cardstock background to make the stencil the focus of this layout. 


I embellished this layout with some of the gorgeous Sawyer Stickers and Sawyer Die-cuts to create interest- the scallop edges are also stickers and then I used the Zip Strip from the Sawyer Paper Packet for another pop of colour. 


I used another Sawyer sticker for my journalling box and also cut the title and the scalloped circle background from the Sawyer Digital Art Kit.


I really love using stencilled backgrounds to create my own patterned paper- and the Digital Art Collections make this so easy as there are a variety of different stencil templates available. 

Thanks for stopping by!  Please continue onto Maz's Blog where you will find her sharing her stencil technique.  Be sure to leave a comment and happy hopping!

Thursday, September 16, 2021

Make It Shine Technique Blog Hop

Welcome to our Technique Blog Hop!  This month there are 11 of us highlighting a technique to make it shine!


This blog hop is a great big circle so you can start wherever you want and continue through to see all the fabulous artwork incorporating this technique.

If you are coming from Haley's Blog you are on the right track! 

I absolutely love our range of Glitter Paper, and I decided to use the new Harbour Glitter Paper to create this card. I cut thin strips and placed them on an angle spaced with the Pumpkin Spice Paper Packet, and then matted the pieces onto White Daisy Cardstock framed With Harbour Cardstock.


I also cut the sentiment using the Harbour Glitter Paper using the Artbooking Cricut cartridge for some extra shine!

The finishing touch was the flower cluster created with Paprika, Papaya and Rosemary Cardstock as well as some more Harbour Glitter Paper in the centre of the flower, using the Layered Flowers Thin Cuts.

Thanks for stopping by!  Please continue onto Tamara's Blog where you will find her sharing her technique to make it shine.  Be sure to leave a comment and happy hopping!

Monday, August 16, 2021

Anything Goes Technique Blog Hop

Welcome to our Technique Blog Hop!  This month there are 11 of us highlighting any technique we would like to share- anything goes!

This blog hop is a great big circle so you can start wherever you want and continue through to see all the fabulous artwork incorporating this technique.

If you are coming from Maz' Blog you are on the right track! 

I love making my own marbled backgrounds using ink. For this project I started by putting Carolina, Bluebird and Sapphire ink on my 5x6 Acrylic Block, and then spritzing with water. Of course, you can use any size block to correspond with your project. 


I then place it over the area I want inked- for this project I cut a tag from the Tags and Tabs Thin Cuts  using Watercolour Cardstock, and I had stamped the image of a shark from the Jawsome Birthday stamp set.

I did a few of these tags- I love how every one is different as I redo the ink every time. 

I then cut a fun envelope for my tags using Bluebird Cardstock, my Cricut and the Artfully Sent cartridge.

Another one of my favorite techniques is a shimmer brush splatter! I stamped the sentiment from the same stamp set in Sapphire ink, and then flicked the Sapphire Shimmer Brush over it.


Here's the finished tag and envelope sleeve- these are being used as little notes for cast members as I have written little notes on the back for our opening night of West Side Story- we are the Sharks!


Ready to go- such a fun and easy way to make a marbled background for any project and the shimmer brush splatter is fun as well!


Thanks for stopping by!  Please continue onto Tamara's Blog where you will find her sharing her favourite technique.  Be sure to leave a comment and happy hopping!

Wednesday, June 16, 2021

Here Comes The Sun

Welcome to our Technique Blog Hop!  This month there are 13 of us highlighting the Sunburst Technique.  

This blog hop is a great big circle so you can start wherever you want and continue through to see all the fabulous artwork incorporating this technique.

If you are coming from Brandi's Blog, you are on the right track! 


I couldn't wait to get my hands on the new Sunburst Background Thin Cuts- how awesome is this for creating a Sunburst effect quickly and easily?

Here are two different ways I love to use this Thin Cut. 

The first way is to cut this using different colours of cardstock or different patterned paper. I cut the frame in Sapphire, and then cut the thin cut using Carolina, Bluebird and the Stars and Sparklers Paper. I then just used the pieces within the frame, like a jigsaw puzzle! I also used a sentiment from the coordinating Spot On Sentiments stamp sets, which coordinates perfectly with the circle part of the thin cut. I stamped the sentiment in Scarlet Ink and the card was finished! 


My second way is to simply put some patterned paper behind the thin cut. Here I cut the thin cut in White Daisy Cardstock, and simply glued it on top of the black silver star cardstock from the Happiest Place Coordinating Cardstock. I kept with the silver theme by stamping a firework from the Stars and Sparklers Cardmaking Stamp Set in Charcoal Ink, and then rotating the stamp and stamping the next layer with Versamark and embossing with Silver Embossing Powder. I then stamped the sentiment in Black Ink from the Party Girl stamp set. 

Thanks for stopping by!  Please continue onto Kim's Blog where you will find some additional artwork highlighting this technique!  Be sure to leave a comment and let me know which card you like the best,  and happy hopping!

Sunday, May 16, 2021

Just Distress Oxide It!

Welcome to our Technique Blog Hop!  This month there are 10 of us highlighting different ways to use Distress Oxide inks.  This blog hop is a great big circle so you can start wherever you want and continue through to see all the fabulous artwork incorporating this technique.


If you are coming from Tamara's Blog, you are on the right track! 

I love using Distress Oxides to create my own backgrounds when I don't have the right colours or papers lying around. To start off with for this particular scrapbook page, I simply swiped Abandoned Coral and Picked Raspberry Distress Oxide inks over a piece of Mink Cardstock


Here's the finished layout- but lets have a look at some of the details that distress oxides a great way to do a background. 


The Mink cardstock showing through the distress inks really mimics the look of the Hillside Cottage Paper with the distressed look- it shows up on the journal sticker too. 


Dropping water onto a distress oxide background creates a fun look too- and as seen here you can still use embellishments and stamps directly onto the inks such as these Hillside Cottage Shapes or this title stamped with Intense Black ink from the Hillside Cottage Cardmaking Stamp Set


Here's the completed layout with photos and journalling- I'd love to know what you think!


Thanks for stopping by!  Please continue onto Judy's Blog where you will find some additional artwork highlighting this technique!  Be sure to leave a comment and let me know what you thought of my variation and happy hopping!

Friday, April 16, 2021

Dazzling Dimension Technique Blog Hop

Welcome to our Technique Blog Hop!  This month there are 12 of us highlighting different ways to add dimension to your projects.  This blog hop is a great big circle so you can start wherever you want and continue through to see all the fabulous artwork incorporating this technique.

If you are coming from Melissa's Blog, you are on the right track! 

I knew how I wanted to add dimension to my project- Cricut cut flowers from the Flower Market collection! I cut out a few different flowers in Grape, Lemonade, Avocado, Flamingo and Nectarine cardstock. I also added some Gold Glitter Gems to the centres of the daffodils. 


I added all of these flowers to the mason jar stamp set from the Eat Play Love Cardmaking stamp set, and also added the sentiment from the April Stamp of the Month, Scandinavian Folk Art Greetings. I used the Mix In Paper Packet for the polka dot background, accented with a strip of checkered paper from the Daisy Meadows Paper Packet and matted on Flamingo Cardstock


I got even more layers added to my card by popping everything up on
3D Foam Tape- such a quick and easy way to add dimension!


Thanks for stopping by!  Please continue onto
Cat's Blog where you will find some additional artwork highlighting this technique!  Be sure to leave a comment and let me know what you thought of my variation and happy hopping!

Tuesday, March 16, 2021

Altered Wooden Shapes Technique Blog Hop

Welcome to our Technique Blog Hop!  This month there are 11 of us highlighting altered wooden shapes.  This blog hop is a great big circle so you can start wherever you want and continue through to see all the fabulous artwork incorporating this technique.  


If you are coming from
Melissa's Blog, you are on the right track!  

Today I wanted to show you a really fun way to add a pattern to the plain wooden shapes that Close To My Heart sells. I am using the Wood Hearts but you can use this technique on any solid wooden shape. 


See the intricate floral pattern on the wings on the March Stamp of the Month, Winged Masterpiece? I grabbed the dragonfly wing from the set and then simply stamped the wing 
pattern over the wooden shape using Intense Black ink, and left to dry. 


I then added the heart to a strip of Lagoon cardstock, and created the rest of the card using the In This Together collection of paper, cardstock and dots. 


Here is the finished card- the sentiment is also from the March Stamp of the Month. Stamping a pattern on the wood hearts really makes them coordinate with the floral paper and adds such fun to the project! You can use any wooden shape and any patterned stamp to create a look that suits your card or layout.

Thanks for stopping by!  Please continue onto Cat's Blog where you will find some additional artwork highlighting this technique!  Be sure to leave a comment and let me know what you thought of my variation and happy hopping!

Tuesday, February 16, 2021

"It's Faux" Blog Hop

Welcome to our Technique Blog Hop!  This month there are 13 of us highlighting faux techniques.  This blog hop is a great big circle so you can start wherever you want and continue through to see all the fabulous artwork incorporating this technique.  


If you are coming from Darlys' Blog, you are on the right track!  

Today I wanted to show you a faux patina look to use on your card backgrounds. A patina is described as a green or brown film on the surface of bronze or similar metals, produced by oxidation over a long period. Rather than used aged metals on a card, here's a fun way to fake the look!

To start, I ran a piece of White Daisy cardstock through the Spring Blossoms Embossing Folder, which I had covered in Toffee ink. This left a lovely imprint of brown ink on the cardstock. I then sponged over this with layers of Ballerina, Canary and Espresso inks to create an aged look. The last thing I did was randomly sponge Versamark ink over the embossed piece and added some gold embossing powder over this, which I then set using a heat gun. I was then left with this beautiful aged look for my card background.


I then added a strip of Lovely paper, matted with Canary cardstock. I then added the sentiment in Espresso ink from the Perfect Match stamp set, and used Ballerina and Espresso cardstock that I cut with the Stitched Circles Thin Cuts.


This is a great way to get the vintage aged looked in a lot less time- you can use any metallic embossing powder and any colours of ink to create a background. Silver, brown and blue is also a wonderful combination and great for masculine cards!

Thanks for stopping by!  Please continue onto Alyson's Blog where you will find some additional artwork highlighting this technique!  Be sure to leave a comment and let me know what you thought of my variation and happy hopping!

Saturday, January 16, 2021

Striped Borders Blog Hop

Welcome to our Technique Blog Hop!  This month there are 10 of us highlighting Striped Borders.  

This blog hop is a great big circle so you can start wherever you want and continue through to see all the fabulous artwork incorporating this technique.  

If you are coming from Darlys' Blog, you are on the right track!  

Today I wanted to show you a fun background technique using the Happiness Lives Here cardmaking stamp set. I simply inked it up using Black ink and stamped each border on a diagonal across some White Daisy cardstock.


To make this card fun, I added very slim strips of different coloured cardstock behind the stamped piece, and then cut the Thank you sentiment form the Thin Cuts using a piece of Watercolour Paper that I had coloured using different watercolour paints. I then stamped the Thank you sentiment using Intense Black Ink over the coloured area.


I also added some Black Shimmer Brush splatters onto the card base for an extra touch, and placed the thank you sentiment onto the stamped background using 3D Foam Tape

Thanks for stopping by!  Please continue onto Alyson's Blog where you will find some additional artwork highlighting this technique!  Be sure to leave a comment and let me know what you thought of my variation and happy hopping!